Plate layout generation
All methods · March 16, 2026 · Jan Hellemans
Plate layout annotation is a repetitive, error-prone step in qPCR experiment preparation that most researchers handle manually. We show that four well-chosen parameters — block grouping, orientation, style, and replicate placement — are sufficient to automatically generate well annotations for the majority of practical use cases while respecting individual lab preferences and pipetting workflows.
Every qPCR experiment starts from the same basic elements: a list of samples to be measured, a set of assays (targets) to run on those samples, a chosen number of replicates per sample-assay combination, and a plate format (e.g., 96-well or 384-well). Together, these determine the total number of reactions that need to be distributed across the available wells.
Translating these elements into an actual plate layout is where things get tedious. For each reaction, a well position must be assigned. The result is a complete well annotation: which sample, which assay, and which replicate occupies every well on the plate. Most researchers handle this step manually, either sketching layouts on paper, filling in Excel templates from previous experiments, or clicking through instrument software well by well.
This manual process is not just time-consuming. It is error-prone, particularly when experiments grow beyond a handful of samples. A misassigned well can compromise an entire run. And because annotation is rarely standardised, layouts are difficult to reproduce or compare across experiments.
Automating this step is not straightforward. Different labs have different preferences for how wells should be organised. Some prefer filling columns first, others rows. Some want tight rectangular blocks for multi-channel pipetting, others want to maximise plate utilisation without gaps. A one-size-fits-all layout would be rejected by most experienced users.
Our approach is to identify a small set of parameters that capture the key decisions researchers make when designing a plate layout. We find that four settings are sufficient to generate well annotations that cover the majority of practical use cases while respecting individual preferences and pipetting workflows. These four settings are described below.
Setting 1 · Block by
Determines how reactions are grouped into blocks on the plate.
- Assay: all reactions for a given assay are placed together. This is the natural choice when preparing one reaction mix per assay, as it aligns the plate layout with the pipetting workflow. Each block contains all samples measured with the same assay.
- Sample: all reactions for a given sample are placed together. Each block contains all assays measured on the same sample.
The choice affects how many distinct mixes need to be distributed and in what pattern. Aligning block grouping with mix preparation reduces the risk of pipetting errors.
Setting 2 · Block orientation
Controls the direction in which wells are filled within and across blocks.
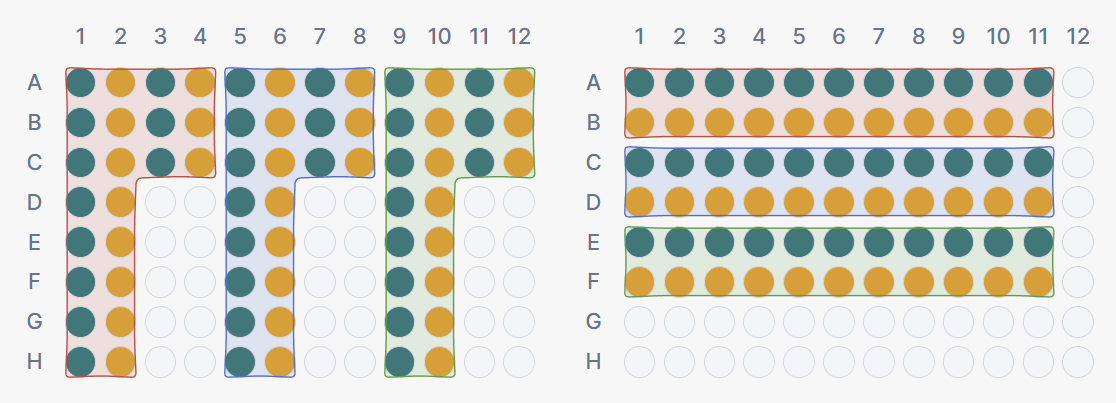
- Vertical: blocks fill top-to-bottom within columns before moving to the next column. This produces tall, narrow blocks.
- Horizontal: blocks fill left-to-right within rows before moving to the next row. This produces wide, flat blocks.
The preferred orientation often depends on the type of multi-channel pipet used in the lab. An 8-channel pipet operates along columns, making vertical orientation a natural fit. A 12-channel pipet operates along rows, favouring horizontal orientation.
Setting 3 · Block style
Determines how blocks are arranged relative to each other on the plate.
- Rectangular: each block occupies a clean rectangular region. Blocks are aligned to row or column boundaries, which may leave empty wells between blocks. The benefit is structural clarity: for a given block, all reactions of the same sample occupy the same row (or column, depending on orientation). This property is particularly useful for multi-channel pipet users, as it allows dispensing an entire row or column in a single pipetting action.
- Continuous: blocks are placed immediately after one another without gaps. This maximises plate utilisation and avoids empty wells, but means individual blocks may wrap across rows or columns. A block boundary may fall mid-row.
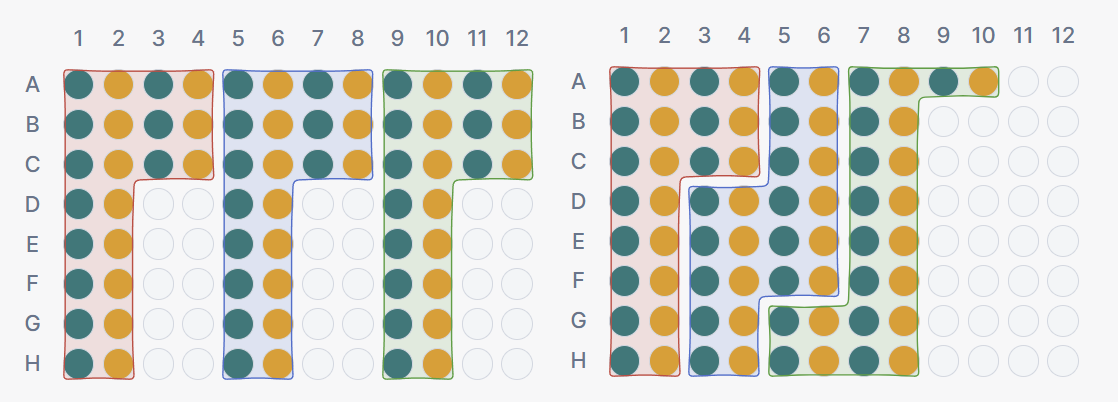
The trade-off is between plate utilisation (continuous) and structural predictability (rectangular).
Setting 4 · Replicate placement
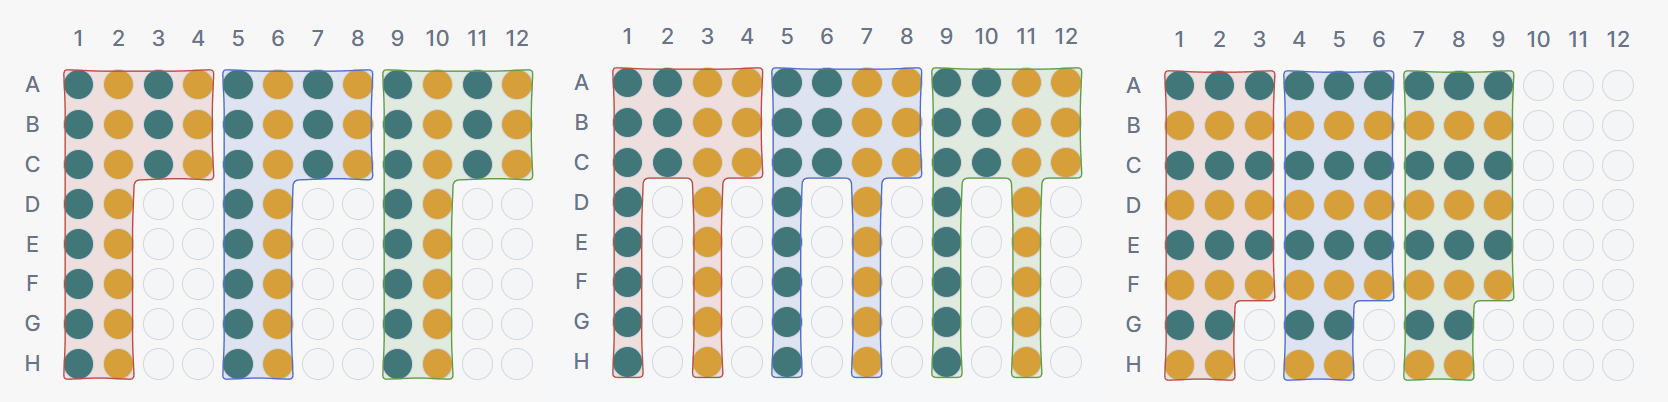
Controls where PCR replicates of the same sample-assay combination are positioned within a block.
- Adjacent: replicates are placed in neighbouring wells, directly next to each other. This is the most common approach and simplifies visual identification of replicate groups on the plate.
- After all: replicates are distributed across the block with other reactions between them. This can help detect position-dependent effects within a block, as replicates are exposed to different local conditions on the plate.
- Stacked: reactions are ordered first before moving on to the next sample. Not well suited for multi-channel users as this loses the spacing of the sample source but might be preferred by single-channel pipettors who want to organize serially.
Certain experiment setups introduce additional layout considerations beyond these four core settings. Multi-run experiments, for example, require a decision on whether blocks may cross run boundaries or must be contained within a single run. For 384-well plates, quadrant-aware placement can align wells with the transfer pattern from 96-well source plates. These are handled as separate options when applicable, rather than as part of the core generation settings.
Default configuration
When using Auto mode, Clarida selects the following defaults:
| Setting | Default | Rationale |
|---|---|---|
| Block by | Aligned with mix configuration | Matches the plate layout to how mixes are prepared, minimising pipetting complexity |
| Block orientation | Vertical | Column-first filling is the most common convention; switched to horizontal when it reduces the total number of plates required |
| Block style | Rectangular | Prioritises structural clarity and multi-channel pipet compatibility over plate utilisation |
| Replicate placement | Adjacent | Most widely used in practice; simplifies visual inspection of replicate consistency |
These defaults aim to produce a layout that is practical for the majority of routine qPCR experiments. They can be overridden individually through Assisted mode.